스파르타코딩클럽 웹개발 종합반 4주차 수강후기.
오늘은 진짜 열심히 했다.. 이제 5주차만 남았는데...! 두둥
4주차는 이때까지 배운걸 반복학습을 통해서 내 것으로 만드는 과정이었다.
서버 / 클라이언트 호출 방식을 파악하고 실제로 로컬에서 실행해보는 것.
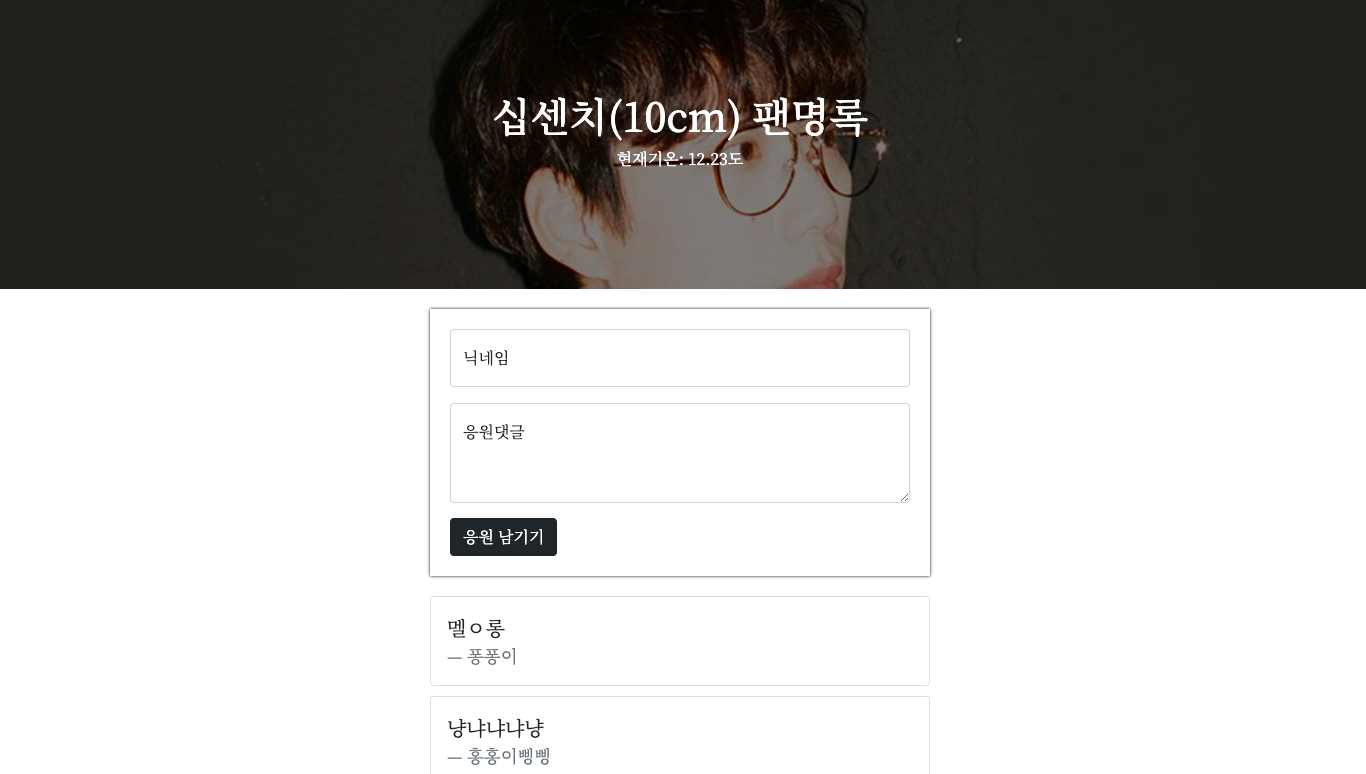
마지막 과제는 팬명록에 글 남기기 -> DB에 저장 -> 저장된 정보를 뿌려줌 까지였다 !
서버 쪽은 Flask 패키지를 사용하였다. 엄청 쉽다!!
https://flask.palletsprojects.com/en/2.0.x/
Welcome to Flask — Flask Documentation (2.0.x)
flask.palletsprojects.com
[수업 목표]
- Flask 프레임워크를 활용해서 API를 만들 수 있다.
- '화성에 땅사기' API를 만들고 클라이언트에 연결한다.
- '스파르타피디아' API를 만들고 클라이언트와 연결한다.
01. Flask 시작하기 - HTML파일 주기
- Flask 기초: 기본 폴더구조 - 항상 이렇게 세팅하고 시작!
-
👉 Flask 서버를 만들 때, 항상,

   	프로젝트 폴더 안에,
     **ㄴstatic 폴더** (이미지, css파일을 넣어둡니다)
     **ㄴtemplates 폴더** (html파일을 넣어둡니다)
     **ㄴapp.py 파일**

    이렇게 세 개를 만들어두고 시작하세요. 이제 각 폴더의 역할을 알아봅시다!

    (꼭 참고!! venv는 실제로는 보이지만, **안보인다~**라고 생각하세요! 기억하시죠?)
-
- Flask 기초: HTML 파일 불러오기
-
-
👉 **templates 폴더의 역할을 알아보겠습니다.** HTML 파일을 담아두고, 불러오는 역할을 하죠! - 1) index.html 예제코드
-
<!DOCTYPE html> <html lang="en"> <head> <meta charset="UTF-8"> <meta name="viewport" content="width=device-width, initial-scale=1.0"> <script src="https://ajax.googleapis.com/ajax/libs/jquery/3.5.1/jquery.min.js"></script> <title>Document</title> <script> function hey(){ alert('안녕!') } </script> </head> <body> <button onclick="hey()">나는 버튼!</button> </body> </html> - 2. html 파일 불러오기 (👉 flask 내장함수 render_template를 이용합니다. 바로 이게 프레임워크의 위력!)
-
from flask import Flask, render_template
app = Flask(__name__)

## URL 별로 함수명이 같거나,
## route('/') 등의 주소가 같으면 안됩니다.

@app.route('/')
def home():
   return render_template('index.html')

if __name__ == '__main__':
   app.run('0.0.0.0', port=5000, debug=True)
-
02. 조각기능 구현하기
-
- 프로젝트 준비 - URL에서 페이지 정보 가져오기 (meta태그 스크래핑)
- 어떤 부분에 스크래핑이 필요한가요?
- 우리는 URL만 입력했는데, 자동으로 불러와지는 부분들이 있습니다.
- 바로 '제목', '썸네일 이미지', '내용' 입니다.
제목, 썸네일 이미지, 내용은 자동으로 불러와짐 - 👉 이 부분은, 'meta'태그를 크롤링 함으로써 공통적으로 얻을 수 있습니다. meta태그가 무엇이고, 어떻게 스크래핑 하는지, 함께 살펴볼까요?
- meta 태그에 대해 알아보기
- 메타 태그는, <head></head> 부분에 들어가는, 눈으로 보이는 것(body) 외에 사이트의 속성을 설명해주는 태그들입니다.
- 예) 구글 검색 시 표시 될 설명문, 사이트 제목, 카톡 공유 시 표시 될 이미지 등
- 우리는 그 중 og:image / og:title / og:description 을 크롤링 할 예정입니다.
- meta 태그 스크래핑 하기
- 연습을 위해 meta_prac.py 파일을 만들어봅니다. 기본 준비를 합니다.
- [코드스니펫] - 크롤링 기본 코드
-
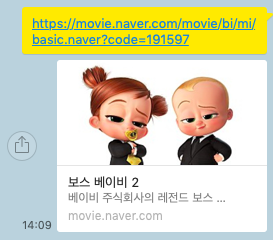
import requests from bs4 import BeautifulSoup url = 'https://movie.naver.com/movie/bi/mi/basic.naver?code=191597' headers = {'User-Agent' : 'Mozilla/5.0 (Windows NT 10.0; Win64; x64)AppleWebKit/537.36 (KHTML, like Gecko) Chrome/73.0.3683.86 Safari/537.36'} data = requests.get(url,headers=headers) soup = BeautifulSoup(data.text, 'html.parser') # 여기에 코딩을 해서 meta tag를 먼저 가져와보겠습니다. - select_one을 이용해 meta tag를 먼저 가져와봅니다.
-
og_image = soup.select_one('meta[property="og:image"]') og_title = soup.select_one('meta[property="og:title"]') og_description = soup.select_one('meta[property="og:description"]') print(og_image) print(og_title) print(og_description) - 가져온 meta tag 의 content를 가져와 봅시다.
-
image = og_image['content']
title = og_title['content']
description = og_description['content']

print(image)
print(title)
print(description)
- 연습을 위해 meta_prac.py 파일을 만들어봅니다. 기본 준비를 합니다.
03. POST 연습
1) API 만들고 사용하기 - 포스팅API (Create → POST)
1. 요청 정보 :  URL= /movie, 요청 방식 = POST
2. 클라(ajax) → 서버(flask) : url, star, comment
3. 서버(flask) → 클라(ajax) : 메시지를 보냄 (포스팅 완료!)
2) 전체 코드
- 서버소스 (app.py)
-
@app.route("/movie", methods=["POST"]) def movie_post(): sample_receive = request.form['sample_give'] print(sample_receive) return jsonify({'msg':'POST 연결 완료!'}) - 클라이언트소스(/templates/index.html)
-
function posting() {
    $.ajax({
        type: 'POST',
        url: '/movie',
        data: {sample_give: '데이터전송'},
        success: function (response) {
            alert(response['msg'])
        }
    });
}

<button onclick="posting()" type="button" class="btn btn-dark">기록하기</button>
04. GET 연습(보여주기)
1) API 만들고 사용하기 - 보여주기 API (Read → GET)
1. 요청 정보 : URL= /movie, 요청 방식 = GET
2. 클라(ajax) → 서버(flask) : (없음)
3. 서버(flask) → 클라(ajax) : 전체 영화를 보내주기
2) 전체 코드
- 클라이언트 소스(/templates/index.html)
-
$(document).ready(function(){ listing(); }); function listing() { $('#cards-box').empty() $.ajax({ type: 'GET', url: '/movie', data: {}, success: function (response) { let rows = response['movies'] for(let i = 0; i < rows.length; i++) { let image = rows[i]['image'] let title = rows[i]['title'] let desc = rows[i]['desc'] let star = rows[i]['star'] let comment = rows[i]['comment'] let star_image = '⭐'.repeat(star) let temp_html = `<div class="col"> <div class="card h-100"> <img src="${image}" class="card-img-top"> <div class="card-body"> <h5 class="card-title">${title}</h5> <p class="card-text">${desc}</p> <p>${star_image}</p> <p class="mycomment">${comment}</p> </div> </div> </div>` $('#cards-box').append(temp_html) } } }) } function posting() { let url = $('#url').val() let star = $('#star').val() let comment = $('#comment').val() $.ajax({ type: 'POST', url: '/movie', data: {url_give: url, star_give: star, comment_give: comment}, success: function (response) { alert(response['msg']) window.location.reload() } }); } function open_box(){ $('#post-box').show() } function close_box(){ $('#post-box').hide() } - 서버소스(app.py)
-
from flask import Flask, render_template, request, jsonify
app = Flask(__name__)

from pymongo import MongoClient
client = MongoClient('내 URL')
db = client.dbsparta

import requests
from bs4 import BeautifulSoup

@app.route('/')
def home():
   return render_template('index.html')

@app.route("/movie", methods=["POST"])
def movie_post():
    url_receive = request.form['url_give']
    star_receive = request.form['star_give']
    comment_receive = request.form['comment_give']

    headers = {
        'User-Agent': 'Mozilla/5.0 (Windows NT 10.0; Win64; x64)AppleWebKit/537.36 (KHTML, like Gecko) Chrome/73.0.3683.86 Safari/537.36'}
    data = requests.get(url_receive, headers=headers)

    soup = BeautifulSoup(data.text, 'html.parser')

    og_image = soup.select_one('meta[property="og:image"]')
    og_title = soup.select_one('meta[property="og:title"]')
    og_description = soup.select_one('meta[property="og:description"]')

    image = og_image['content']
    title = og_title['content']
    description = og_description['content']

    doc = {
        'image':image,
        'title':title,
        'desc':description,
        'star':star_receive,
        'comment':comment_receive
    }

    db.movies.insert_one(doc)

    return jsonify({'msg':'POST 연결 완료!'})

@app.route("/movie", methods=["GET"])
def movie_get():
    movies_list = list(db.movies.find({},{'_id':False}))
    return jsonify({'movies':movies_list})

if __name__ == '__main__':
   app.run('0.0.0.0', port=5000, debug=True)
'IT > Web' 카테고리의 다른 글
| [Apache] CentOS7 httpd SSL 인증서 적용 방법(https) (0) | 2023.01.23 |
|---|---|
| [프론트엔드] 스파르타코딩클럽 웹개발 종합반 5주차 수강후기 (2) | 2021.11.20 |
| [프론트엔드] 스파르타코딩클럽 웹개발 종합반 3주차 수강후기 (0) | 2021.11.18 |
| [프론트엔드] 스파르타코딩클럽 웹개발 종합반 2주차 수강후기 (1) | 2021.11.16 |
| [프론트엔드] 스파르타코딩클럽 웹개발 종합반 1주차 수강후기 (1) | 2021.11.16 |


댓글